Just the Shell commands for Skype Trouble Logging

I wanted to take a few minutes to just document a simple thing. Well the scope of the subject can become complex quickly. But this is not that. This is just a quick review of how to get the basic log output so you can troubleshoot a Skype issue.

I have a Video for this topic on Youtube.

So now matter how you approach logging, you will end up needing the Skype Debugging Tools.

The Debugging tool contains the Snooper log tool you will use to analyze the log. But It also contains the Skype GUI for also collecting the logs. So let me say your best method to collecting the Skype logs is to use the Gui in the Debugging tool kit. Here is a link for covering that topic: here

If the debugging tool kit is not working, you have another choice here that will act as a GUI for Log collection and analysis. Why not have a back up.


Command Line Logging

We are not going deep into Command line. If you want that please look here.

This is the emergency list of command if you just need to get logs now. below are the basic commands in order.


  • Show-CsClsLogging -Pools “pool.domain.com”
  • Start-CsClslogging -scenario  alwayson
  • Stop-Csclslogging -scenario “AlwaysOn”
  • Search-CsClsLogging -OutputFilePath “C:\Users\admin\mylogs\ouput.txt


This is the bare bones commands you can use in a pinch to get your basic logs.


Scenarios there are many you can run

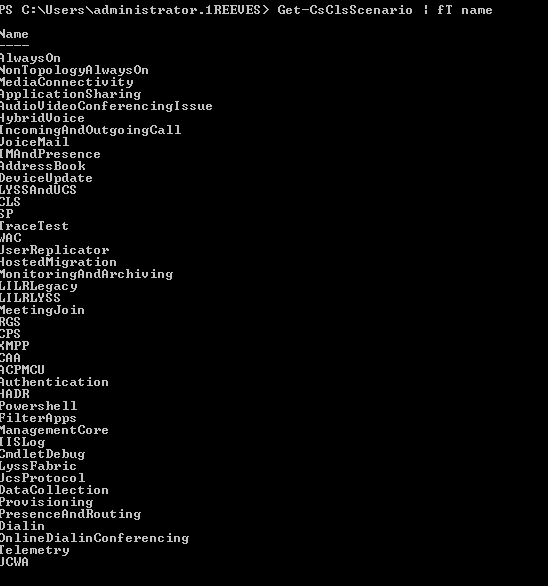
So the one item missing from the commands above is a way to get the different scenarios you can choose. In order to get this information, just run the following:

  • Get-CsClsScenario | fT name

This command is important as you can target what your looking for more clearly by using the right scenario to log:

clsloggingscenario

So one thing to note is that the always on log will collect the sip stack trace, which is used in the lion share of Skype troubleshooting.

So now below I will include some examples of command you may find useful. this is not exhaustive, but this is the main things you may need for an average log collection


  1. Is logging running – Show-CsClsLogging -Pools “skypepool.domain.com
  2. Run Edge Log- Start-CsClsLogging -Pools pool.domain.com -Computers edge.domain.com -Scenario alwayson
  3. Complex search by time- Search-CsClsLogging -pools “pool01.contoso.net” -StartTime “11/20/2012 08:00:00 AM” -EndTime “11/20/2012 09:00:00 AM” -OutputFilePath “C:\Logfiles\logfile.txt”


To conclude, this is the crude basics you need to get those logs. if you want additonal information on hoe to make your own scenarios, that is very doable. see here for additional information if you are interested.


Thank you and happy logging.


Louis


Jetstress – Too Many IOPS? Andrew Higginbotham

Hello all,

This is a shout out at my Friend Andrew Higginbotham. This man is a multi-MVP and MCM in Exchange Server. He penned an article about Jet Stress, Which is very useful.

The issue is Page Fault Stalls/sec and the subject is SSD Solid State Drives.

I admit to not spending my time in Jet stress, as I don’t work on design elements as much as I do Skype. Andrew has come to my rescue on a few Design issues and Jet Stress on more than one occasion.

It turns out you should read this if you using SSD Flash Drives and Jet Stress= Here

This quick reference in my Blog is to support Andrews Blog and Recommend you read everything he writes. He is truly one of the best Exchange Persons around the US neighborhood.

Andrew thanks for your time on this case. I hate not being the expert but I am proud to work on a team with such strengths. I am just glad to be part of a team of individuals whose strengths compliment each other.

Jetstress – Too Many IOPS?


Louis

Edge Replication Status is false and the Last Update Creation time stops updating for command get-csmanagementstorereplicationstatus

When it comes to Edge Replication checking, this looks like a false positive below. But I know we all like to see true. So you see where the date says 6/22? That change means the last status report was a few month’s earlier. That missing update creation, is possibly saying the replication is not working. this is not hard to fix, so lets fix it!


Perform the steps below:

  1. Go to the Front end server and open Skype Management Shell
  2. Run the command Export-CsConfiguration –Filename C:\filename.zip
  3. Copy the file to the Edge Server.
  4. Open the Skype for Business Deployment Wizard
  5. Choose Install Or Update Skype for Business Server System
  6. Choose install local configuration store.
  7. Browse to the file and finish the wizard.
  8. You can restart the Edge Server or just wait several minutes.
  9. If this fails, you just need to restart the SFB replication service on the FE and Edge Servers.


This is the point at which you browse to the configuration Zip file. Its Step 7.

I hope this helps your issue. I have seen this just stop refreshing and this step normally fixes the issue in my experience.


Louis

How to repair Software service won’t start on a domain controller or Windows software protection will not start access denied 5. on server 2012 R2.

Good day all,

I had the strangest activation issue today. I decided to detail the issue If I ever see it again. So I must admit, the whole idea came from searching the core team blog. My issue was the Software activation service would not start. This resulted in all of the activation related items failing from the customer perspective.

My particular error code was a little different, but the error verbiage was the same. I considered the verbiage enough to try a few things, and I found success. Its always important to share success.

The Core Team can solve your issue without me, so feel free to consult their article. I am just showing the folder and registry locations I needed to add the SPPSVC to, for my protection service to start. This is apparently only on a Domain Controller, Hence the name.

The Key was to add the NT Service\SPPSVC to some specific locations, both in the Folder system and the Registry. There was a little trick here. You have to deselect the domain, when choosing the account. This caused me to wallow along for much longer, as I never thought of doing this on my own power. That is where the Core Team Saved me. Thank you guys.

Screen shots of my 42DC Server look like:


Just to be clear what I am saying, you are to not use active directory groups when making your search. If you do, the NT SERVICE\SPPSVC will not be

there. So select your local machine and add your group. It should be there.


So now we understand how to make an otherwise mysterious user account show up on a Domain controller, here we go with the folder and registry locations.

  1. The Store Folder Located:

C:\Windows\System32\spp\ – Right click and chose the store folder permissions

2. The SPPSVC registry folder located at the  SPPSVC folder

Regedit\Computer\HKEY_LOCAL_MACHINE\SYSTEM\CurrentControlSet\Services\SPPSVC

3. The SoftwareProtection Registry Folder located at

Regedit\Computer\HKEY_LOCAL_MACHINE\Software\Microsoft\Windows NT\CurrentVersion\Software Protection

4. This one, I don’t know if this was necessary, so I would not do this unless it was your last gasp:

  • Take ownership of C:\Windows\System32\SPPSVC.EXE
  • Make sure you screen shot original permissions and put them back
  • Add SPPSVC as needed.

Those were the locations I found. Now I did not find this all on one MS KB, so I certainly don’t recommend this is a true fix for an issue. I simply found this in the moment of trying to get a customer back into functionality. Please look to the core team for updated information. This will supersede anything I have here today.


Update 6/22/2017


So in my one particular case, there was an additional location that changed. I had to find it with PROCMON by sysinternals. Using Procmon, I followed the MS blog to capture the traffic. I did not even need to filter the traffic. It clearly showed the WPA folder in the registry was missing a permission. Since the Service stared, after I made this change, It was definately the network service that was missing:

Here is the Key Location in regedit:

Computer\HKEY_LOCAL_MACHINE\SYSTEM\WPA


I hope this may help get you out of a Jam, and I hope your licensing functions well.

Louis

Das Cache – Help Support Das Cache Sandisk

Good day,

I wanted to write a little something about DAS Cache.  You may not have heard of it. In fact, Unless you purchase a Dell Server, you may not ever be exposed to it. Apparently, When you purchase a Dell Server, you may purchase an application called Das Cache.

Please be advised the support for this product is available only if you have a Pro Support Contract with Dell. See the sales information on this product here.

“San Disk DAS Cache software is fully supported by Dell Services and available with the purchase of a next-generation Dell Power Edge server”


Tell Dell Support you have Das Cache

After Spending a little time with this product, the main support incident happens when the support person is not told that Das Cache is installed on the system. The fact is this product is simple and will not likely fail. But, the key point is when Das Cache is Deployed, It takes the Place of windows, in terms of manageability and control.

What happens is either the IT person or the support agent treats this disk as a Windows Disk, trying to run operations on the disk directly. You can’t treat a DAS Cache Disk as a windows disk. I am thinking, this first fact is the cause of Support-ability problems with the product.


Use the Das Cache GUI

The Gui of Das Cache is simple. You simply select a Disk to use as the scratch disk, and a volume, which serves as your data volume. Das Cache keeps copies of the most used data, on an SSD Drive. I found that it doesn’t have to even be SSD. It could be just two Sata Jbod Disks.

The way you set this product up Is you select “add Cache” at the right side of the application window. You select disk 1, then disk 2, and finish. The product is now using Disk1 as a cache for the data volume Disk2.

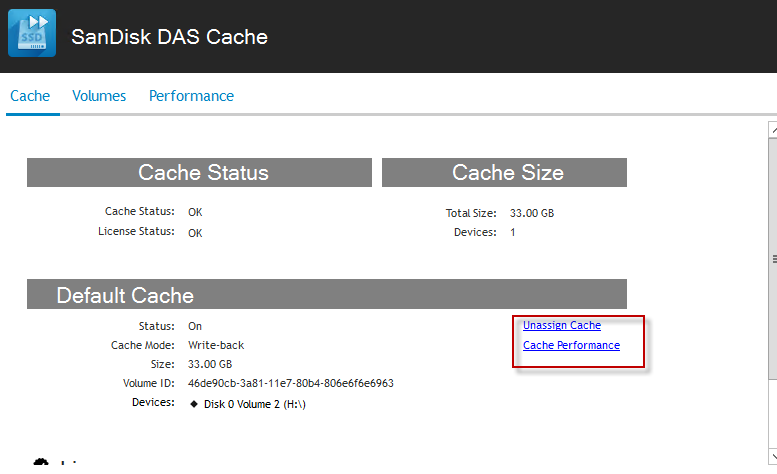
If you want to do anything to that data disk, or the cache disk, the only option you have is to use the GUI, and assign or un-assign cache from the cache tab:

1

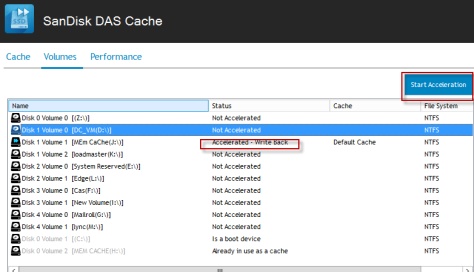
Or you may stop or start acceleration from the volumes tab:

2

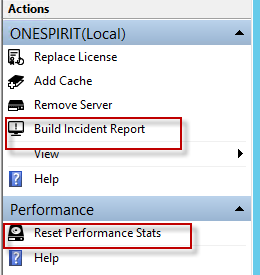
The only other thing you can really do is reset performance statistics or Build an Incident report. This menu is off to the right hand side, of the GUI interface.

3


What troubleshooting vs. recreate Cache

In all honesty, the amount of troubleshooting that can be done on this simple product, is very limited. The danger of this product is if you try to go into windows and do things to this disk. Instead of doing that, you can just come into the DAS Cache GUI, stop accelerating, and then removing caching. Then you can come in and create the same cache, and choose start accelerating. That should be the extent of troubleshooting.

Most Common errors

My understanding is the most common errors with this technology is File Server Resource Manager errors. For example, here are some known issues with FSRM.

In reviewing File server resource manager, My advice would be to disable it and find out if the errors stop. If they do, then, it would be a question of disabling specific settings in FSRM to find out, what setting is incompatible.

I could see certain aspects of FSRM not being happy with Das Cache. On the other hand, these errors are likely false positives, as the Cache itself is not part of the actual File Storage system. As long as the Cache is working. I would say you just have some erroneous errors to contend with.

In the most extreme, you should just stop caching, stop accelerating, and perhaps re-configure the cache. The only reason this technology would have any trouble is if you made changes to the disk inside windows. Just make sure you use the DAS Cache GUI only, and you will be fine to troubleshoot with that only.

Take Away

To troubleshoot with windows, you should remove caching and acceleration, to troubleshoot the disk, by itself.

In conclusion, I hope this is helpful, if you have to take this your support team, just make sure the first thing you tell them is you have a Das Cache setup. That is an important point. Otherwise, that leaves the support team looking at, what they think is a Windows disk, with some very unusual failures.

Thank you


Louis


#I work for Dell Services.

Some tips on fixing Warning – Reverse DNS does not match the SMTP Banner


I have a pretty common error that I get asked about pretty frequently. I wanted to take a moment to hopefully share some information on what the error is, what to focus on, and what tools you need to fix and monitor.

First of all, please understand this paper covers the simplest of scenarios. Multiple sites, Smart Hosts, Bridgeheads, and multiple Accepted Domains will quickly muddy the waters, but for a basic Exchange Server, This Article Applies directly.


The Error

Exchange Server 2013 SMTP banner does not match reverse lookup. or

Warning – Reverse DNS does not match the SMTP Banner


Disclaim

First be aware, there is a lot of misinformation out there. Stop and read and understand, before you decide which articles are telling you the truth. This error is likely to pop up in a few situations. I wanted to take a minute to clarify this message and what is needed to clear this up.

First you must understand this error  is directional and relative to a point in mail flow. So you really have to nail down your situation before you set out on solving the problem. You risk getting yourself more confused. Speaking of that, let me try to hopefully explain in a simple way.

First let me say the SMTP Banner is more generally a problem for outbound mail. You may still get an error for inbound connectors,  but mail will not usually fail either. Internal mail uses Internal banner (host) and DNS, and external mail uses External Banner and DNS.  An error comes about, generally where you have mail received across the public internet, where a reference is made to an internal FQDN in the SMTP Header.

Inbound Banner

So if you think you have an inbound banner issue, just go into your inbound mail connector, and then try to save it, without making changes. If there is a problem, you should get a pop up message similar to figure A

Figure A. Inbound Banner issues are identifiable


Exchange will promptly give you an error when your inbound connector has a banner issue. Why you ask? Because  the Banner is checked by Exchange, against the security settings.  Think of it like a security Guard. They always check you coming in, but once you have cleared security, it is not as difficult to leave.

So I won’t go into the explanation of inbound banners, except to say, by the time your mail hits this server, the lookup is internal, so the Banner should always be internal. In addition, you have a server, with a certificate, matching this FQDN, so it should make sense that these should all be the same name. Do what the error says and set the Banner to the Internal FQDN.

Outbound Banner

Outbound is really the same sort of thing, for any outbound Internal Connectors. Internal connector, Internal FQDN. The change comes when you have an outbound Internet connector. So this connector will be the banner for your reverse look ups by external recipients. That is, unless you have a third party device doing store and forward for you, in which case, you should be able to set the SMTP banner there as well. Assuming you don’t use a smart host, your Send connector header would look like this:


Figure B. Send Connector Scoping Tab.


This should make sense. You see this is the external facing send connector. Once mail leaves this connector, the mail will be called External Mail. From this point mail will have to rely on MX, DNS or a Smart host to propagate.

So.. What do you think gets queried for the reverse lookup? The mail server at the destination Is going to query public records it finds, against the header and other information it has received, when it looks your mail domain up. So the checks done include reverse lookup, Public MX record, A record, Text Record and SPF record. So all you need to do to is make sure these records contain your correct Public IP address for your Exchange server, the correct resolution of the  Banner to an IP address, and verify the other records contain the same Name and or IP addresses.

A light conversation

So now we get to brass tacks. So I want to focus you to the main things you would need to set correctly. This is:

  1. Public MX record -Domain.com resolves to target mail.domain.com at PUBLIC IP address
  2. An “A Record” that is the value of the Banner “Mail.domain.com”
  3. An “A record” for values for your setup like “auto-discover.domain.com”
  4. TXT or (PTR) record for your Reverse Lookup DNS record. One domain should be assigned to one PTR record- this is what should match the “send” banner
  5. SPF record. – . Special record with special format for Domain verification by Anti-Spam. SPF record tool will help generate your record

Tools you can use to make sure your records are correct:

  1. Install Dig on your client machine for windows- Dig -x Public IP (will find your PTR record)
  2. Dig domain.com will give you your “A” record.
  3. Dig mail.domain.com txt – will show your SPF record.
  4. Dig mx domain.com to query MX record, or Dig @nameserver.domain.com yourdomain.com

So with this Dig tool, you can check and cross check. If you have an IP address in this mix, that you are not aware of, or are not using, then you will need to fix this.

I am not going into too much detail here, but if you have all these records in place, and make sure they point to the public IP address, which sends the exchange server its mail, then you should be happy. Use the web site IPCHICKEN.COM on your Exchange Server. It will tell you your Public IP, normally used for Setting Public DNS records. For non-smart host or bridgehead customers, your value of IPCHICKEN, should be your Public IP values for these records.

In Closing

You have the public information you need to set records above. Set this correctly. Second, go to Exchange Server and set the FQDN correctly and you should no longer have SMTP banner failing to match the reverse lookup:

  • Send Connector Mail Flow -> Send Connector-> Scoping-> FQDN
  • Receive Connector  Mail Flow -> Send Connector-> Scoping-> FQDN

Make sure these FQDN matches its function. Internal connector is internal FQDN.

Send Connector is Public FQDN. Then make the Records match the correct public values and this issue will be resolved.

In closing Here are some tools you can use to troubleshoot:

Exchange Connectivity.

Dig Bind Tool

MX Tool Box

I hope this is helpful and explains what you are seeing, and how you can fix your SMTP banner issue.

Thank you,


Louis


Why Network Design was so Important for Hyper-V CSV Clusters. A look Back Hardware teams are still Valid today, if you have the hardware.

I realize I have written several Hyper-V articles lately. They all come for the unique perspective of technical  support. I now see, I have been trying to put together some material to help understand how these new 2016 Clusters are from the 2012 Clusters from the 2008 Clusters.

So I want to express three clear goals in this paper. I want to define a list of items you may want to read, to make your Cluster as supportable as possible. Second, I simply want to speak to the Importance of your NIC hardware purchases, as it relates to the past and current Stance of Microsoft, with respect to Network requirements, of  Hyper-V cluster setups. Finally, I just summarize some of the command line setting you may look at if you don’t have the optimal NIC setup for a Cluster.


Disclaimers


      • I agree with one who commented below, this is getting old now, and may not be best advice. I agree. However, I wanted to make this article, to document that you are not trapped into using software teams. This was written just as software teaming was getting off the ground. We has alot of customers who were not getting the performance they wanted. For example, an LBFO cluster is not a SET cluster. Your not going to Get RDMA speeds if you have 3 1GB nics and that’s your cluster. Be aware that alot has changed from 2012 to 2016. Take the time to experiment if you have that luxury.
      • Read on only to see what the past opinions were, and that there are threads of truth in stopping to think, is hardware teaming going to work? Be aware that you may have two choices, depending on what you are trying to do.
      • Try Both ways if you have any doubts.
      • Disclaimer (agent), While there are items in this discussion, that may not be good advice, for your particular Infrastructure, or your particular situation, I am writing this from a familiar perspective, that Admins, and Designers are approaching me from. Namely this is an “I want it all, and I want it all to work now!” type of design steps.
      •  Translation: (customer needs)Give me the settings that make the fullest use of my server, give me the most VMS, with the most possible resources, and I want to Live Migrate them all day long. Furthermore, I want to be able to host conference in an RDP session, on any one of my Cluster Nodes, and not have any problems.
    • The bottom line  is this was written for 2010- 2015 clustering. In 2018 you have to know exactly what kind of cluster your setting up, and dont even try it unless you have some 10 GB nics. this is the way things have evolved in 2018. The SET and LBFO clusters are what you likely want to set up. The SET cluster is the best choice but you need good 10GB networks.


Facts and Common issues in today’s and yesterday’s Hyper-V CSV Clusters


With this disclaimer in mind let us proceed. First things first. I am providing this list based on my 10 years with Hyper-V and Clustering, along with the reading and video information I have come across.:


      1. Never Use the (Hyper-V) shared Network Adapter as a NIC in the Host Server.
      2. Never Software Team with the NDIS driver Installed from your NIC vendor.
      3. Software teaming is fine for most workloads, unless you’re having latency problems. The answer is Hardware Teaming, or Vice Versa
      4. Don’t put SQL servers on your Hyper-V host.
      5. VM QUEUING can be a problem. Try your workloads with and without VM Queuing and see which works best for your situation.
      6. TCP Offload is not supported for Server 2012 Cluster Teams. Check the other settings here
      7. The Preferred software Team setting is Hyper-V PORT virtualized, switch Independent teaming is best. This is where we are at today. Remember, you had access to these statements in current documentation.
      8. If you Use the Multiplexer Driver as the Virtual Machine NIC, do not turn around and share that NIC with the Hyper-V Host. This is not pretty.
      9. Use Jumbo Frames, QOS etc., where you’re supposed to, according to the current guidelines
      10. Piggy Back off of #8 is that today’s Clusters with Hyper-V, are a balance of Isolation and Bandwidth networks. There is no hard fast rule on how many Network adapters you need.
      11. You cannot just say a node is too slow or fast. When you first install the server, you need to perform clearly laid out, baseline testing, where similar results can be obtained for your server, in pristine condition, with no other workloads. The Same is true for Virtual Machines.
      12. You cannot run a Hyper-V CSV cluster, with all your NICS in the TEAM. You need at least 3 networks in any version of Hyper-V. This is
        1. Cluster Only (Cluster Communication)
        2. Cluster and Client (Management etc.…)
        3. No Cluster Communication. (ISCSI)
      13. Run Cluster Validation- If your updates don’t match across your cluster, you need to get all your nodes to match, before the cluster will work properly.
      14. Clustering only recognizes one NIC per sub-net, when you add multiple NICS to cluster
      15. Back up applications and Antivirus, may have compatibility issues, disable both, and see if the issues disappear.
      16. Network Considerations
      • The Binding Order and DNS must match your current MS documentation. DO not miss this.
      • Cluster Setup now adds rules to the firewall automatically. If you are using Symantec Endpoint. These Firewall rules can serve as your port list to add to Symantec firewall.
      • You can Now Sysprep with Cluster Role installed now for Server 2012.
      • Your NETFT is enabled at the physical NIC, Where you find your IPV4 properties.  Do not Disable it.
      •  So if you are setting up converged clusters, you now have to rely on cluster validation to tell you, if you have enough networks to effectively set up your cluster. Resolve any of the network issues here in validation
      • CSV traffic includes Metadata Updates and Live migration data, as well as failure recovery (IE no storage connectivity) you cannot break this traffic into isolated streams.
      • CSV needs NTLM and SMB- don’t disable either.
      • ISCI Teams now work with MPIO and Jumbo Frames. Jumbo Needed for ISCSI
      • Using multiple Nic Brands Is now preferred.
      1. This series of Articles covers topics I did not go into In Depth. Topics Include:
        1. Mapping the OSI model
        2. VLANS
        3. IP routing
        4. Link Aggregation and Teaming
        5. DNS
        6. Ports, Sockets and Applications
        7. Bindings
        8. Load Balancing, Algorithms


Cluster nodes are multi-homed systems.  Network priority affects DNS Client for outbound network connectivity.  Network adapters used for client communication should be at the top in the binding order.  Non-routed networks can be placed at lower priority.  In Windows Server 2012/2012R2, the Cluster Network Driver (NETFT.SYS) adapter is automatically placed at the bottom in the binding order list


Network Evolution and common sense Network needs

This section is really addressing how we build clusters today. For example, See recently how I wrote a paper on using the old Isolation rules for a simple 2016 cluster, based off the old method of deployment. This method is elegant and works well, will little maintenance needed.

For 2012, and forward, we have the new design which is detailed in the Tech net article, “Network Recommendations for a Hyper-V Cluster in Windows Server 2012”. In this paper, it  Includes the modern setup, using the a software team, and scripted Network Isolation

This paper interleaves these two philosophies, at least that was the intent or message, you are always using one or the other as a guiding principle. Insofar as you have the technical reasoning to do so. what I mean is, if you have 10GB nics, you may fully move to the 2012 method. If you have like 3 1GB nics, you are leaning on the 2008 article to explain to the customer why live migration would not work properly.

Get logging information for Hyper-V and clustering from this article

The quick history of the CSV cluster as follows:

2008

Heartbeats/Intra Cluster Communications -in some documentation  (1GB)

CSV I/O Redirection  (1GB)

VM Network (1GB)

Cluster Network (1GB)

Management Network (1GB)

ISCSI Network – (1GB)


2012 and 2016

HeartbeatsNetwork Health monitoring in some documentation (QOS IMPORTANT)  (10GB)

Intra Cluster Communications (QOS IMPORTANT)  (10GB)

CSV I/O Redirection (Bandwidth Important)  (10GB)

ISCSI Network – Not registered in DNS (10GB)


This is where you can clearly see how new clusters in 2016, just don’t have the same specifications. The recommendation here is to adjust the Cluster Networks, by the number of network adapters, and what the throughput is. If the NIC setup looks like the 2008 cluster, then apply 2008 network setup guidelines. If the cluster has 2 or more 10GB nics, then treat it as the newer 2016 logic. This has worked well for me for some time now. This will ensure that you get the best Isolation and throughput for your customer.

So as you can see, the Number of NICS is going down, but the NIC SPEED is going up. To make matters more difficult, Microsoft Now states that to be optimized, a CSV cluster will have a combination of Isolation and Bandwidth. They are no longer able to lean on the hard 5 to 7 NIC requirement that once was the norm. For proof of this, you will need to watch this video entitled. ” Fail over Cluster Networking essentials. ”

So really, Support may not be giving you a great explanation as to why your CSV cluster is slow. It is really closely related to the Network Design. Does your Network look more like a 2008 cluster, or a 2012 or 16 cluster? This will give you justification as to why a cluster would be slow or fast.

Server 2012 Requirements are here, along with a basic script for Embedded Teams

In addition to the script above, you also have control over the heartbeat, and other things like priority of the various Cluster NICS and timeouts.


Settings you may look at to change if needed

The rest of this article, just shows you some config settings, if you find you have to make a manual change. With a 2016 cluster, they are saying its all automatic, and should not be changed.

While you can make changes to the following. The recommendation is to leave the settings alone. The automatic settings should adjust to the proper, situational network changes:


Configure Cluster Heart Beating


(Get-Cluster). SameSubnetDelay = 2


The Above command Is an example of how you set the following variables. They are posted below with their Default values


  • SameSubnetDelay (1 Second)
  • SameSubnetThreshold (5 heartbeats)
  • CrossSubnetDelay  (1 Second)
  • CrossSubnetThreshold (5 heartbeats)

The above setting Is for regular clustering. For Hyper-V clustering, consider the following defaults

  • SameSubnetThreshold (10 heartbeats)
  • CrossSubnetThreshold (20 heartbeats)

If you go more than 10 to 20 on these two settings, the documentations says the overhead starts to interfere, more than the benefit. FYI.

This Step Below is only for allowing the creation of the cluster on a Slow network. Set the value of SetHeartbeatThresholdOnClusterCreate  to 10, for a value of 10 seconds.

HKLM\SYSTEM\CurrentControlSet\Services\ClusSvc\Parameters
add DWORD value SetHeartbeatThresholdOnClusterCreate


Configure Full Mesh HeartBeat

(Get-Cluster). PlumbAllCrossSubnetRoutes = 1


Other Important changes to change Cluster Setup Parameters

Please Be advised, All the following syntax, has been duplicated from this publicly available Microsoft Article:

Change Cluster Network Roles ( 0=no cluster, 1=Only cluster communication, 3=Client and Cluster Communication)

  • (Get-ClusterNetwork “Cluster Network 1”). Role =3
  • Get-ClusterNetwork | ft Name, Metric, AutoMetric, Role
  • ( Get-ClusterNetwork “Cluster Network 1” ).Metric = 900
  • ( Get-ClusterNetwork “Cluster Network 1” ).AutoMetric = $true

Set Quality of Service Policies (values 0-6) ( Must be enabled on all the nodes in the cluster and the physical network switch)

  • New-NetQosPolicy “Cluster”-Cluster –Priority 6
  • New-NetQosPolicy “SMB” –SMB –Priority 5
  • New-NetQosPolicy “Live Migration” –LiveMigration –Priority 3


Set Bandwidth policy (relative minimum bandwidth policy) (It is recommended to configure Relative Minimum Bandwidth SMB policy on CSV deployments)

  • New-NetQosPolicy “Cluster” –Cluster –MinBandwidthWeightAction 30
  • New-NetQosPolicy “Live Migration” –LiveMigration –MinBandwidthWeightAction 20
  • New-NetQosPolicy “SMB” –SMB –MinBandwidthWeightAction 50


If you need to add a Hyper-V replica

  • Add-VMNetworkAdapter –ManagementOS –Name “Replica” –SwitchName “TeamSwitch”
    Set-VMNetworkAdapterVlan -ManagementOS -VMNetworkAdapterName “Replica” –Access –VlanId 17
    Set-VMNetworkAdapter -ManagementOS -Name “Replica” -VmqWeight 80 -MinimumBandwidthWeight 10
    # If the host is clustered – configure the cluster name and role
    * (Get-ClusterNetwork | Where-Object {$_.Address -eq “10.0.17.0”}).Name = “Replica”
    *(Get-ClusterNetwork -Name “Replica”).Role = 3

From <https://technet.microsoft.com/en-us/library/dn550728(v=ws.11).aspx>

Configure Live Migration Network

  • # Configure the live migration network
    Get-ClusterResourceType -Name “Virtual Machine” | Set-ClusterParameter -Name MigrationExcludeNetworks -Value ([String]::Join(“;”,(Get-ClusterNetwork | Where-Object {$_.Name -ne “Migration_Network”}).ID))

From <https://technet.microsoft.com/en-us/library/dn550728(v=ws.11).aspx>


Other Commands

  • Enable VM team Set-VMNetworkAdapter -VMName <VMname> -AllowTeaming On
  • Restrict SMB – New-SmbMultichannelConstraint -ServerName “FileServer1” -InterfaceAlias “SMB1”, “SMB2”, “SMB3”, “SMB4”


Creating or migrating the CMS of a SQL 2014 Always on Availability Group for Skype for Business 2015.

Creating or migrating the CMS of a SQL 2014 Always on Availability Group for Skype for Business 2015


I think one you get done with your deployment, you get to sit back and Enjoy the Honey of your Efforts. But If you are Migrating a SQL Always On Availability Group, See Below for some steps!


Basic Bullets steps


  1. Review Prerequisites
  2. Don’t try this on Lync 2013. This must be done using A fully patched SFB Fe Servers, as well as Fully Patched Server 2012 R2 Machine.
  3. So point # 2 is the reason for this article. The word is, Lync 2013 is not supported, but it works. Below you may see the gotcha, and be able to set it up.
  4. Install the Clustering Role on both SQL Servrs with Add-WindowsFeature Net-Framework-Core, Failover-Clustering, RSAT-Clustering-Mgmt,RSAT-Clustering-PowerShell -Source d:\sources\sxs
  5. Do not try to use SQL 2016. Only use SQL 2014 with SFB 2015 and Server 2012 R2-
  6. Test-Cluster -Node SQL1, SQL2 and make sure you have pre-requisites correct.

Follow the documentation of your choice to install your Skype for Business on SQL, but please review the notes from my friend in the Field, Timothy E Boudin. His notes may come in helpful, if you’re facing the move, and see no documentation. This is what he ran across, and brought to me. Thank you to Tim , for bringing this issue up so I could write about it:

First Find your Links for the Job

Skype

SQL


So to summarize, you should basically move the CMS when you do the SQL always on Availability group in my opinion. Otherwise, you are going to have to come back later, and do the second part of this cold. This is just an opinion. Below, Please Find Tim’s, Comments on his Move of the CMS with SQL Always on and Lync 2013, and SFB 2015 Migration.


Skype for Business setup using SQL always on Clustering

This configuration requires some unique settings for the build of the Skype for Business (SFB) support when dealing with the issue of supporting the CMS migration from Lync 2013 or previous versions to SFB 2015.


For this discussion the servers are as follows

Enterprise Front End Servers (3)

FE1, FE2, FE3

Always on SQL Cluster servers (2)

SQLNode1, SQLNode2, SQL Listener

During the process of defining a new Enterprise Front End pool, you provide the names of the Servers that are members of the pool as normal, but when providing the new Back end servers information you have to handle this in a specific way to be able to support fail-over.

Create the new SQL Server Store as follows


Fill in the name of the SQL Listener in the SQL Server FQDN field


Provide the name of the SQL Instance if your using one.

Check the High Availability Settings option

Select SQL Always-on Availability Groups

Fill in the name of the SQL Node1 server

Click OK and complete the Front End pool Wizard.  When you Publish the changes to topology you should be prompted to provide details on how you want to establish the tables for the Cluster.  If this is setup by a DBA check with them on location of the Data and Log files.

Once publishing is completed, go back and edit the SQL Store settings and change the SQLNode1 setting to SQLNode2 server name.


Publish the change and then do an Install or upgrade a Database

Once publishing is completed, go back and edit the SQL Store settings and change the SQLNode1 setting to the SQL Listener server name.  Now publish a finial time.  There is no need to do an Install Database for this change.


Once the finial publish is complete you should be able to start services on the Front End Pool servers.

Move the CMS

To move the CMS from the previous location to the Front End pool using the Always-on Cluster use the following process.

  • Stop Services on the Front End Pool to be hosting the new CMS location
  • Open the Lync Power-Shell and use the following commands:

Stop-cswindowsservice

  • Backup the CMS to a file with the following

Export-CsConfiguration –filename c:\media\cmsbackup.zip

 Create the new Tables for the CMS on the new Front End pool specifying the node1 of the cluster, when you specify the database paths they are listed by Log file location first and then by Data file location.

Install-CsDatabase –CentralManagementDatabase –SQLServerFQDN SQLNode1.contoso.com -databasepaths g:\RTC_logs,f:\RTC_data -sqlinstancename RTC –verbose

 Once the tables have been created, have the DBA verify Mirroring between the nodes is in place.

 Enable-cscomputer

Get-CsManagementStoreReplicationStatus

If replication is good then move the CMS to new server by using the Move command on the Front end server in the target pool.

Move-CsManagementServer


Once the move is complete, allow for server replication and then Run local Setup in the deployment wizard on all affected Front end servers and reboot them and Monitor replication

Get-csmanagementconnection

Get-CsService –CentralManagement


I hope this is helpful Documentation, if you have to face this situation.


Thank you,


Louis

Use a Baseline Database Generator Script for reviewing performance of SQL Instance

Use a Baseline Database Generator Script for reviewing performance of SQL Instance

For anyone trying to troubleshoot a Slow SQL server, I wanted to come up with a test that will take the SQL issue and generalize it. Why does this need to be generalized? I have found that a customer or a support team may introduce a bias in all aspects of the tests. Begin with the Data. Data is impossible to to show a unique result. You may say this database does not go as fast as my favorite one, on a separate server. you cannot accurately prove one server is faster or slower then another server. Why?; for a basic Idea, take look at another case, where I lay out some basic testing tenets to go by.I will re-state them here. They sound like car rules, but they are universal testing rules you can apply to any situation.

From Car Rules to Computers

  1. The performance should be documented and repeatable.
  2. More than one test should be run, and simple is usually more realistic.
  3. Tests should be standardized, down to a science, so that if applied to another matching scenario, you would expect similar results.
  4. Keep the time down to a short test. The longer the test, the more variables can be introduced.
  5. Do not focus on two separate car models not functioning the same, find a way to introduce a baseline into what a reasonable car will perform like. Then prove or disprove your baseline.

In order to get a good unbiased test result for SQL, I came of with a dynamically created SQL database, that gets created once. Once Created, you can run some test on this standardize database, and compare with results on, say your laptop, or another machine, where your processor, Memory and disk resources are similar. All you have to do is to follow the method. One simply must not use ones own data.

Read on-Grab the download from here or the top of the page.

The SQL Baseline for Customers who report server A is slow then Server B.

Disclaimer

When a customer claims that one machine is slower than the other, there is always the possibility the customer has an actual baseline. However, when they say one is slower than another, this usually indicates they don’t know what a baseline is.

A Baseline is a collection of metrics, about the server, when it is installed at Greenfield time. When the Server is first Deployed with SQL, a baseline should be taken. Then, future claims as to a slow server, should be taken against itself; not another server.

When a person wants to compare two servers, this is almost an impossible ask. It’s like asking us to compare why two people do not complete a personality test in a similar way. From a support standpoint, it is a fruitless pursuit, and often creates a bad CE, in trying to fulfill their request.

The goal of this process, is to give Support and the customer a way to meet on common ground. The customer claim that the server is slow may as well be translated into, The Data on my servers does not match!! And they are correct. And we don’t support data. The Key word is Data. This question of “SLOW-ER” pulls us into the customers’ data sets.

This process gives us a way to use our own data set. The advantage cannot be understated. We will be telling them one machine is slower or it’s not.

Accepting that generally one machine is slower, do not underestimate this result, as the customer re-introduces his production elements. If the Baseline test show a machine 20% slower, then any difference, more than 20%, will be due to specific workloads introduced by the customer. All of the SQL Subject matter experts have known this, but we all spend weeks trying to find the leverage to prove it. Without an “absolute”, we could not substantiate that claim. This caused these cases to last for months. This method below, should cut these cases into a two day case, at most.


The Process


In the following test for SQL you will see four files, which compose of a method of base-lining SQL performance, without using Bias Data from the Customer, or a third party company. This Test Is devoid of the implication of using cashing or indexing, so it is a perfectly simple test to illustrate capabilities between two machines.

The reason this test has been devised is due to customer demand. Customers often ask us to compare two adjacent machines. Often times these comparisons can only be done using apples to oranges methods. Often times, these cases end up being a point of contention for the customer and for support teams. The goal of this test is to mitigate that disparity.


Here are the files you will need

Figure 1. Files you will need


SupportBaseline.xlsx

The Excel Spread sheet is to be filled out and returned to Support. We keep a master copy of this spread to monitor the scripts performance against a variety of machines and situations. Over time, we will have a database of how this script performs, on average, across a multitude of platforms. And the simple measure we are obtaining, is time. How long does it take the baseline query to complete?


Test Parameters

The Results of the script, should answer the question, is my “server” really slower than average, or slower than another server? In order to do this, strict adherence to rules must occur. This test must be run, with all other operations terminated on the SQL server. There should be no Antivirus running, there should be no other applications running. Other than a baseline Windows machine, with core applications and services running, the server should be running SQL with no client connections. In other words the SQL machine needs to be out of production.  There are columns In SupportBaseline.xlsx, but it will be noted in the analysis, that the machine was in production, and the results may not reflect a true baseline.

Several baseline runs can be collected with the single variable as the total number of rows, this script will create. The default is set to 1 million. The recommendation is a million rows, on average. However, depending on how powerful the server is, or how much down time you are allowed, you can adjust this variable to fit into your needs CreateSupportTest.sql is the file where this change is made see below.


Figure 2. Where to adjust how long the script will run

How long do I run the initial test?

As a general rule, 1 million rows should take less than 15 minutes on a reasonable SQL server. However Performance degrades fast. For example, A SQL VM with only 3 GB of ram, will take 121 minutes to run the query. So the first run should be 100,000. Then multiply the length of time it takes to complete by 10.

This is how long a million rows should take to complete. You can judge how many rows you should choose, depending on the amount of time you want the query to take to complete.

Process

  1. Determine how long you want to run the query. Follow How long do I run the initial test?
  2. Set the value of the # of Rows. Follow Test Parameters
  3. Record the initial values of the server in the XL spread SupportBaseline.xlsx
  4. Run the Query named CreateSupportTest.sql here is a how to if you need it
  5. Record the results in the Excel spread sheet SupportBaseline.xlsx. use start and stop time and it will auto populate the time of execution
  6. Repeat as necessary, populating the spread sheet, and returning to Louis Reeves in Support support. He is keeping the overall list of how the query runs in several different scenarios and can give you more information about how your query results compare to other machines running the same query
  7. When you are finished testing a server, there are two scripts that are cleanup scripts. Run DropSupportTest.SQL. here is a how to if you need it
  8. Then run DropSupportMaster.SQL. here is a how to if you need it

That’s it, Now you can complicate things, by running things like Diskspd against these machines, but, it will be best to just keep it simple and stay with the program laid out. If you desire to look at diskspd, go ahead and read The Fallcy of Performance or; Are you bringing your Support Agent Apples or Oranges? This will help you the plan for running Diskspd commands. So here you really have two ways to testing the claim of a SLOW:


I hope this series of articles is helpful in troublsehooting issues with model data.

Louis.


The Fallacy of Performance or; Are you bringing your Support Agent Apples or Oranges? VM Virtualization Performance with DiskSpd.

The Fallacy of performance.

I don’t think you don’t already know this. My experience does tell me that we all group things together naturally and sometimes the performance issues we find, are really assertions made, with one piece of evidence. This performance claim is generally hard for a support agent to frame. Not that your case wont be worked, on. It will. It just it may take support teams hours or weeks to get to the truth of your statements.

I have to write this because it is so prevalent. When someone calls me and they want to open a support case, I generally try to standardize the case to some truthful statements, which I can prove, disprove, or alter.

However one such case type, that does not fit into such neat lines is the Virtualization of Performance case. Rather than describe in computer terms, let’s use American Auto Makers Ford and Chevy.

Baselines Matter

I Studied Ford and Chevy Specifications for months. I know the performance characteristics of each very well. Let’s even say I own a Chevy, and I am now looking for a second car of equal specifications. Let’s even say I own a Ford and am looking for a second ford. Then I purchase that second car, and on the way home, I find that the one car does not seem to meet the specifications of the first!

Of course I must call the car company and make the complaint that one car is not as fast as the other, or not as quick to brake, or some other specification. How about this; the air is not as cold in one as it is in the other!! This is what happens in Performance calls.

Just so you know we technically should not even entertain these types of questions. But in support we do, to some degree, because we want to help, and were not sure what your showing us yet. We don’t see the pieces for several calls.  You can’t force it, it just takes time.  This is because you are asking us to form a relationship to ideas that are not related. Two cars are not related, two computers are not related.


How about taking a cross country trip? One car crossed the country in three days. The other took 4. At this point you may be seeing my point. Trying to get down to difference in different items, of any type can be like comparing apples to oranges. What’s even worse is when one of the items is off limits. So My Ford is definitely slower, but my wife takes the other ford to work so we really can’t use that one for testing! Now what do we do?

Basic Performance assumptions

So there are some simple rules that you should apply to any performance problem:


  1. The performance should be documented and repeatable.
  2. More than one test should be run, and simple is usually more realistic.
  3. Tests should be standardized, down to a science, so that if applied to another matching scenario, you would expect similar results.
  4. Keep the time down to a short test. The longer the test, the more variables can be introduced.
  5. Do not focus on two separate car models not functioning the same, find a way to introduce a baseline into what a reasonable car will perform like. Then prove or disprove your baseline.


Now obviously, the complexity of computers can result in more rules, but if you follow these basics, you can at least find some sanity in your test results. In fact Support has an absolute need, that this happens. It is very possible, nothing is really, wrong, if we don’t get down to brass tacks.

So real world

Call into support and report when you run this command on one machine, things are fine. When you run on the other environment, things failed. This is the Disk Speed command. This is the replacement for SQLIO. I really like this tool.


  • diskspd –b8K –d30 –o4 –t8 –h –r –w25 –L –Z1G –c20G  D:\iotest.dat > DiskSpeedResults.txt


However, what is hiding in this statement, violates all the 5 rules above. This is an assertion, based on one command. Furthermore, you ran this command, in the test location,  over and over, while other VMS are also running, randomly, creating a random pattern of storage fragmentation, while the Production environment was only one once, in a very controlled situation. These commands were not run in a scientific fashion.

It literally took me a days to think of a way to baseline this situation and to  test this correctly. This is where the 5 rules came from. I think they are solid rules for support to go by. So here is how you test to make your case to Support:

User Guide and Product here

Introduce a Baseline. Anything is better then nothing

The Above diskspd command is complex and long. Come up with some simple tests and run more of them, over time. Second, test your commands, on a laptop, or desktop, with a specific Ram, Storage, and Processor Profile. Once you record all the results on the client machine, duplicate the test in the Virtual Machine. Make sure it’s the only Virtual Machine Running. Make sure nothing is running on the Host but this one VM, with specific resources.

Now below I am not giving you results. I am just giving you the commands, Along with some Instructions on how to use DSKSPD. I am also leaving you with Articles that VMware and Microsoft Hyper-V use, when asking for baseline testing. Notice, how many little requirements they have Seem familiar? There is a reason for this! We are all trying to be scientific.

Tests to establish a Baseline.

  • .\diskspd -c100M -d20 c:\test1 d:\test2
  • .\diskspd -c2G -b4K -F8 -r -o32 -W30 -d30 -Sh d:\testfile.dat
  • .\diskspd -t1 -o1 -s8k -b8k -Sh -w100 -g80 c:\test1.dat d:\test2.dat
  • .\diskspd.exe -c5G -d60 -r -w90 -t8 -o8 -b8K -h -L
  • .\diskspd.exe -c10G -d10 -r -w0 -t8 -o8 -b8K -h -L d:\testfile.dat
  • .\scriptname.ps1
  • Same as above- second location
  • .\Diskspd -b8k -d30 -Sh  -o8 -t8  -w20 -c2G d:\iotest.dat


This list will generate about 15 unique results. Any of these will run on a laptop or a server. Just make sure you read the text character decoder sheet available with the product.

So the instructions are very simple. The specs on the Hyper-V or VMware VM, must be the same as the laptop. My laptop has 16GB of ram, and 8 Processors.

The VM must be the only one running, and the OS should be a fresh Install. Now if the results of testing are in the ballpark of your comparison Client, then you are not having a performance issue.

The moral of the story is test from different perspectives, and use the Scientific method, as much as you are able to.

I hope this is helpful in your troubleshooting.


A few other Details

Here is a way to manually pre-create the files if disired

  • fsutil file createnew d:\iotest.dat 20000000
  • fsutil file createnew d:\iotest.dat 2000000000
  • fsutil file createnew d:\iotest.dat 20000000000

Here is all of the best articles on storage, and IO online right now. I was surprised that so many of  Storage Performance Needs are all in one place.

This could be an important point. If you came to this site because your numbers are not matching reality, your Monitoring tools, may not be collecting the right perfmon numbers, then you may need the Hyper-V performance script to use to see your actual VM numbers. try using this tool Run this tool on the host, while using diskspd on your VM.

DO not run more then one instance of Diskspd at once!! This will invalidate your tests!


Finally, as promised, here is how  VMware or Microsoft  handle these issues:


Louis